How to plaster a wall: technology, video instruction
Wall plastering is used quite often. The main task of this work is to level the surface and prepare it for finishing. Although today, decorative plaster is often used as a full-fledged wall covering. Read more about all its features here. And today we will try to reveal to you all the secrets of plastering walls: from preparing the mortar to grouting the surface.
How to prepare a mortar for plaster
Most often, lime-sand or cement-sand mortar is used.
A cement-sand mixture is prepared as follows: Portland cement (M400), fine quartz sand and lime flour are mixed in a proportion of 1 x 2 x 1 and filled with water. The volume of water is determined by calculation or test batch. Where is this solution used:
- when sealing joints in blocks on the stairwell and panels;
- for internal slopes when finishing drywall;
- when aligning rust at the joints of panel ceilings and ceilings;
- with a covering layer on the ground, if coarse sand was present in the solution.
The lime-sand mixture is prepared as follows: fine quartz sand, lime flour and ground lime in a proportion of 2 x 1 x 1. The volume of water is 44% by weight of the dry mixture (18 liters of water are used per 40 kg bag of dry mud). After mixing, you must wait about 30 minutes to complete the quenching process. The solution is used:
- with ordinary wet plaster;
- grouting surfaces of blocks and panels.
Wall plastering begins with preparatory work
Before proceeding with plastering, the surface must be prepared: clean from old materials and plaster, contaminants, rubble, etc. Otherwise, the new plaster may peel off. In the event that the plaster is applied to a concrete surface, it is preferable to make notches first, so the material will hold on better. Also, the wall should be cleaned of dust and primed.
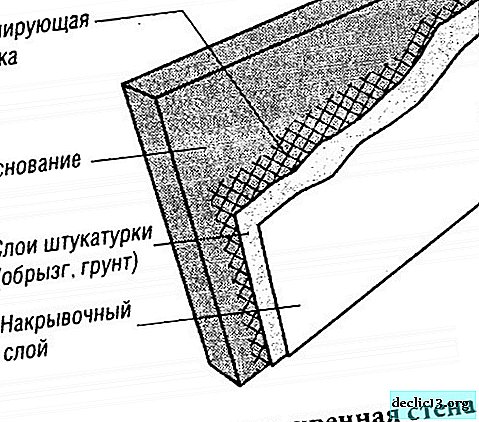
How to prevent plaster cracking? To do this, the surface should be upholstered with reinforcing mesh. This will be especially useful if the wall has various kinds of cracks, marks and joints from various materials, or it is planned to apply a thick layer of plaster. The glass fabric mesh must be “drowned” in the solution, and the metal mesh should be attached with dowels (Fig. No. 1).
What else needs to be checked before applying the solution? Of course, these are vertical deviations. This is done using a rule with a level or a plumb line. By the way, it is easier to plaster the surface if you use guide beacons that are installed in the same plane (1 or 2 meters from each other) and the thickness of the plaster mortar. It is also necessary to moisten the walls with water. This is a very important point, if you do not wet the walls, they will absorb all the moisture from the solution, subsequently the plaster will lose its strength and begin to fall off. After the surface is ready, you can begin to plaster the wall.
Plastering consists of three layers: spray, primer and coating. They are applied in two ways: winding and throwing. Winding is considered to be a simpler procedure, but it is used only for soil solutions and coating layer. While the spray necessarily pounced, and without a certain experience can not do here.
Proceed to plastering the walls
If the concrete or brick surface is even, then you can start applying a thin layer of the solution, trying to rub it as much as possible into various roughnesses.
Spray - completely covers the treated surface. This type of plastering should fill in all the bumps in the wall. It is necessary to prepare a creamy solution, take a trowel or putty knife and start casting from the bottom up. In order for the plaster to adhere more firmly to the surface, this layer is not leveled. No need to make too thick a layer, the optimum thickness is 5 mm. If spraying is done on a wooden surface, then the thickness should not exceed 9 mm.
Soil - this layer is intended for leveling the surface. Before starting this type of work, make sure that the first layers (spray) are well hardened. Sometimes it is necessary to apply several such layers to make the wall perfectly smooth. Each subsequent layer needs to be leveled, especially the last. The solution is applied to the surface by spreading from the bottom up, using a large half-tint. By the way, it is better to use a pasty solution. Thus, you should have a flat surface. Then, while the primer layer has not hardened, make notches along the entire wall with a depth of 2 mm, so that the primer layer is well bonded to the finishing coat.
Nakryvka - the last layer of a creamy solution (2-4 mm thickness). The same solution is used as for the soil. The only thing is better to use the sifted sand through a sieve (cells 1.5 x 1.5 mm). It is applied on carefully leveled soil. If the soil is dry - it must be moistened with water. But the best option for applying an abscess is considered to be soil that has seized, but has not yet dried. In this case, adhesion to the surface will be the most durable. The thickness of the solution depends on the evenness of the application of the soil. After all the applied layers have dried out a little, you can begin to mash the surface. To do this, you need a wooden grater with felt upholstery. Start rubbing from top to bottom in circular motions. By adding, if necessary, a solution to possible depressions on the wall.
What else you need to know
- If on the concrete surface the optimal thickness of the mortar is 5 mm, then it is better to make thicker on brick plaster, about 10 mm. This is due to the fact that seams on the masonry can be seen through a thin layer of plaster.
- A thin layer of plaster, although it is more economical, is more likely to deteriorate and retain heat worse.
- If plastering occurs on low-quality tiles or bricks, where a thick layer of mortar is required, then it is better to lay a metal mesh in advance. Using a wire, the mesh is tied to anchors, which, in turn, are fixed to the wall.
- Today it is often possible to meet a fiberglass mesh that has cells of 5 x 5 mm. It is often used to reinforce various junctions of door and window openings to the wall. It prevents the spreading of plaster mortar. It is also used in the restoration of old plaster and in the device of bulk floors. The mesh is laid on a freshly applied layer. Then, after pasting with a stack of wall corners, adjoining a wall and filling openings, metal protective corner elements are mounted. Now you can start applying a clean external plaster.
- Surfaces that are made of wood are rarely plastered. This is due to the emergence of new materials that allow you to move away from the wet preparation method (the most expensive and time-consuming). But if you still need to plaster the wooden surface, then here you need to know a few nuances. Firstly, the thickness of the plaster mortar should not be less than 25 mm and is counted from the base of the wall.
- With a thick layer of plaster, additional preparation is often required, which consists in driving nails into the surface and wrapping them with wire. It is better to use soft steel wire with a thickness of several millimeters (2-3).
- Thick layers of the solution should not be applied at a time; after drying, they will crack or slide.
- Gypsum-gypsum mortar is often applied to window and door slopes with a layer of up to 50 mm.
Plastering walls requires certain skills and experience. Therefore, it is better to practice other, smaller areas in advance.
Watch the video: Beginner's Guide to Plastering a Wall (May 2024).


-
Guides in Munich - 10 boring excursions in Russian
Excursions in Munich in Russian have long been at the top of the list of the most popular tourist services. Currently, many different companies are involved in organizing them, but in this article we will introduce you to the best Russian-speaking guides and provide a brief overview of the most popular tours. Anna Anna is a professional guide, she graduated from an elite school of guides, has a higher historical education. ... -

-

-