Photo and description of how the propagation of the Phalaenopsis orchid occurs at home
 Each grower, over time, has a natural desire to increase the number of copies of his plants through reproduction. Firstly, it is insanely interesting, and secondly, because orchids are expensive.
Why not try to grow a new beauty on your own, of course, the process is painstaking, but when you admire the result, you simply forget about all the difficulties.
At the same time, if everything is done correctly, the process of propagation of the orchid will go smoothly even at the beginning flower grower.
Features
Each plant species has its own peculiarities in reproduction, of course, the Phalaenopsis also has them. They can multiply by dividing the peduncle, moreover, from a single peduncle can immediately produce a dozen new plants. Also Phalaenopsis has many interesting nuances when reproducing by children.
Differences from other species
 The Phalaenopsis orchid in its structure does not have lateral shoots, that is, it has only one growth point - at the top, therefore it grows only up. And other varieties of orchids have several points.
Phalaenopsis does not have pseudobulbs, because of this, unlike other species, it propagates only by seeds, cuttings and children - absolutely formed by new tiny plants.
Phalaenopsis orchid cannot multiply simply by dividing rhizomes such as Miltonia or Cumbria.
How does the process of an outdoor and indoor plant?
In street conditions, there are two options for the propagation of Phalaenopsis, while at home there are much more. Under natural conditions, Phalaenopsis reproduce very interestingly - the wind carries their pollen, which is in seed capsules, and many different insects flock to their wonderful aroma.
It is worth noting that falling to the ground, Phalaenopsis seeds just can’t sproutThey definitely need soil fungi, from them seeds receive carbohydrates for germination and development.
The second option for the reproduction of this plant in nature is that after flowering, new branches and shoots (babies) appear. Both of these options: seeds and shoots, work well. But at home, the situation is a little different, here is just a way of propagating by seeds - one of the most difficult.
ATTENTION! The processes (children) also appear after flowering, but, naturally, under good conditions of Phalaenopsis, when conditions are created for it that are close to natural or when stimulating the plant.Ways
There are several ways to breed Phalaenopsis at home:
- cuttings - in this case, a flower arrow is used, which is cut into cuttings (of a certain size) with sleeping buds, these cuttings are rooted and new orchids are obtained from them;
- division - this is the way when the plant is divided into two parts (horizontal), the upper part is cut off and rooted separately (a finished separate plant is obtained), and the lower part continues to grow on the previous roots and on it (in the axils of the leaves) sleeping buds begin to wake up;
- children - this is the most popular method of reproduction, when new small orchids are formed and grow from awakened buds, which are then separated from the mother plant (carefully cut) and planted in separate pots;
- seed - for this method it is necessary to create sterile (almost laboratory) conditions, but as a result of success, you may have a new plant with some other colors that differ from the “parents” in color or shape (after all, pollination occurs here).
Is it necessary to stimulate?
Of course, you can wait for the children to appear in Phalaenopsis in a natural way, but this usually takes quite a lot of time. therefore if you set a goal - “reproduction”, then it’s better to stimulate the plant. To do this, there are several ways that will significantly accelerate the formation of children:
 the use of hormonal paste;
- arrangement of temperature differences and drought;
- placing cuttings in greenhouse conditions;
- separation of an adult bush (cut off the upper part).
 the use of hormonal paste;
Very effective many use hormone paste to stimulate, everything is simple here - you need to process the upper kidney. First, with a sharp disinfected blade, slightly cut the scales, then remove it (with tweezers) and apply a little toothpick to a small light green dot (sleeping kidney) with a toothpick. We repeat 3 to 5 times after 3 days, the plant all this time should be at a temperature of 25 - 30 degrees, so that instead of the bud a baby appears.
How to determine if a flower is ready for this?
The orchid has to endure stress, so you need to clearly understand what its condition is and whether it is ready for the reproduction procedure. For breeding at home, only a strong and large plant is suitable, it must be absolutely healthy, in a timely manner to receive all the useful substances necessary for its development - complex fertilizers.
It should have at least 7 leaves and a large number of aerial roots. It is also very important - the orchid must be in the right phase of its life cycle, that is, you can start breeding after flowering. And the best time of the year for this process is spring, in winter it is not worth it to do it unequivocally.
IMPORTANT! You can’t try to propagate an orchid, which was recently purchased in a store. She needs to be given a year to adapt at home.Training
The process of preparing Phalaenopsis for reproduction lasts approximately 2 weeks. At this time, the plant must be placed in an intensely lit place, but with scattered rays of light (at least 12 hours a day). Watering for this period is almost completely stopped (drought mode), we arrange temperature differences, we maintain the daily temperature up to 28 degrees, and the night temperature - 15 - 16 degrees.
We carefully observe the root system - if the roots are already silver in color, and not green, we stand another 2 - 3 days, water it and you can start breeding - the orchid is ready.
Step by step instructions with photos
Next, you can find a description of how to propagate the orchid, and a step-by-step photo of the process.
Cuttings

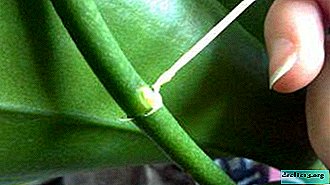
Immediately after flowering, a fresh arrow (cut it to the root) needs to be cut into pieces with one or two kidneys, put them in a transparent container on wet sand or sphagnum and cover with a film on top. Then we wait when the kidneys wake up and the children appear.
It should be noted that the lowest buds on the peduncle are the strongest.
More information about the propagation of Phalaenopsis by cuttings is written here.
Seeds

This method is probably the most time-consuming of all, it is rarely used at home, but as a result, you can get a chic new shape. First you will need a thin stick to make dusting. Further the seed box will ripen (approximately 120 days), then the seeds are placed in a special nutrient mixture and using a syringe we sow (or rather squeeze) into an isolated sterile greenhouse. Over time, tiny children will begin to be born here.
More information about the propagation of this plant by seeds can be found here.
Kids

To begin with, we will stimulate the plant in one of the previously mentioned ways, in addition to using hormonal ointment, the most popular one is to arrange drought and temperature difference. "Drought" here is a rare watering, it must be completely stopped for 2 weeks. As for the temperature difference, the daytime should be provided within 25 - 28 degrees, and night - 16 - 18 degrees.
These joint manipulations will give an impetus to awaken the necessary kidneys and the rapid appearance of children. When the children begin to form, you need to wait until they grow 4 leaves and begin to grow aerial roots - at least 5 cm will grow, then it will be possible to separate.
Division

You can only share an adult bush, that is, Phalaenopsis, having 7 or more leaves, as well as a decent amount of aerial roots. This procedure consists in cutting off the top of the plant, which has at least 2 air roots and 2 to 3 leaves (this will be a separate bush) - thereby giving a powerful impetus to the appearance of children from the axils of the leaves in the lower part of the plant.
The upper part is ready for planting in the ground. And the lower part after a while will delight the appearance of children, which will begin to form in the axils of the leaves. This method of reproduction is also called the "rejuvenation" of the plant, because the upper cut part is the same new independent young plant obtained.
Flower stalk

In this method, it is very important to choose the right moment - need to wait until the orchid finishes blooming, cut the peduncle and cut it so that on each segment there was a sleeping kidney (about 10-12 cm long). Sprinkle the slices with charcoal and leave for a day in a warm place to dry slightly. Next, put our particles in a mini-greenhouse, the substrate there should be very light. It is the hothouse conditions — heat and moisture — that help well “wake up” the kidneys and accelerate the process of the appearance of children.
Rooted

This is the most unclaimed way to breed Phalaenopsis, but of course you can try. When transplanting orchids, for example, you can gently separate part of the roots (longer than five cm) and plant them in a separate pot. They need to be kept in good greenhouse conditions and after a while you will notice tiny leaves - the emergence of a new plant.
REFERENCE! All new small plants that have appeared do not have to rush into the soil immediately. First, let them grow up, gain strength, they should grow roots up to 5 - 7 cm, again here the conditions of the greenhouse will help.The simplest greenhouse can be built using a plastic bag or a cut plastic bottle:
- in a small plastic glass we make drainage holes and pour expanded clay or pebbles into it;
- put wet moss on pebbles;
- install a support on the glass - the cut outlet will rest on it;
- carefully lower the outlet onto the support - it should not touch the moss;
- on top we cover everything with a cropped plastic bottle or just a bag in which we make 5 pieces of ventilation holes (small).
Next, you need to put this mini-greenhouse in a warm bright (with diffused light) place and wait for the roots to grow to the desired length (5 - 7 cm), and then we plant a small plant in a pot.
How to care?
 For new small plants, as well as for any "children", careful and proper care is needed. Otherwise, a young and immature plant may simply die. The soil for them needs to be prepared from the smallest pieces of pine bark - no more than 0.5 - 1 cm, while at least a small part of the soil (and preferably half) should be taken from the parent pot.
For about a year, young plants must be kept in greenhouse conditions. (it is possible under the package), and only then transplanted into the ground for adult orchids, look after adult orchids and wait for flowering.
Conclusion
What conclusion can be made in the end? Well, firstly, definitely, it’s worth trying to propagate your Phalaenopsis, and it’s better to try not in one way, but in different ways. After all, each of us has his own preferences, maybe someone will be able to best propagate it with seeds, or rather, get a new plant.
You can also say with confidence that the orchid that you have grown yourself from the zero cycle will be the most “precious” specimen in your collection.
Watch the video: How to know what's wrong with a Phalaenopsis Orchid from its leaves (May 2024).


-
What are the small wardrobes for clothes, and their features
The design project for a bedroom in most cases involves the installation of a comfortable wardrobe. It is quite simple for owners of large-sized housing to solve this problem, because the space of the rooms is quite large and it is not difficult to fit into a bedroom wardrobe. In the case of a small apartment, the question looks much more complicated. ... -

-
-