Simple ways to grow baby orchid roots

Orchid is a rather whimsical and currently not very common plant in our area. Therefore, it costs a lot of money, and not everyone can afford to purchase. There is only one option left - to propagate the orchid yourself. But to do this is very problematic.
The easiest method of reproduction is considered to be reproduction by children. They grow on their own, but you can make it so that the shoots will appear according to the will of our desire. The main thing is to create the necessary conditions. But it happens that a baby appears on a plant, but for a long time there are no roots on it. And without them it is impossible to plant processes in a separate pot. In this article, we will explain why the roots do not grow and how to deal with this problem.
What is the reason for the lack of rhizome in the appendix?
The reasons are improper care for mom orchid, after all, it is from her that the young appendix is fed. We list them:
- Little light. Remember that orchids, and even more so the one that lets the kids, need a lot of light. It must be dispersed, and its duration cannot be less than twelve hours a day. You may need to purchase phytolamps to help.
- Incorrect fertilizer. Sometimes gardeners use unsuitable top dressing for orchids. Maybe some element is a lot, but some is not enough. And sometimes the whole point is that fertilizers are applied irregularly or rarely. The plant on which the baby develops gives a lot of nutrients, so their reserves need to be constantly replenished.
- Inadequate watering. If there is little water in the soil and in the root system of an adult plant, then even the smallest roots that appear on the process will instantly dry out, as moisture does not reach them.
Review the listed factors and change them if they do not meet the requirements of the orchid.
Why is this a problem?
 As we already said, an orchid is a very difficult flower. Therefore, when she releases a shoot, this becomes a reason for the joy of any grower (you can find out where the children most often appear near the orchid here, but from this article you will find out what needs to be done so that the flower sprouts). But the fact is that without a good root system, the chances of a baby taking root and continuing development in a separate pot are very small.
Therefore, the florist can simply lose the young sprout, the appearance of which it has been waiting for so long. And leaving a developing baby on an adult orchid is not an option, because over time it will take all the nutrients to itself and destroy the entire plant.
Do I need to build up?
This should be decided solely by the grower. You need to think about this question about four months after the appearance of the shoot on an adult orchid. If after this period of time the baby is still without roots, it is worth thinking about helping the baby and how to root it properly.
You can take risks and plant the shoot without an extended root system, but at 80 percent you can be sure that this will not give a positive result. Therefore, before the procedure of separation from an adult plant, we still recommend taking care of the presence of roots on the process.Read more about how to plant the process on the stem of an orchid and how to care for the baby in this article.
Another more acceptable option for any grower will be to grow roots on an already separated baby, how can this be done? There are several options. Which ones - we will describe in the article below. But in any case, we strongly recommend not hoping that the root system on the baby will appear on its own.
To grow the roots of a young shoot of an orchid, it is not necessary to separate it from an adult plant. To begin with, you can try to achieve the appearance of rhizomes on the peduncle. If this does not help, move on to more radical measures. All methods will be described in more detail later in the article.
Artificial Ways
In foam
The first way to build up the root system is to swim on foam.
- First you need to separate the baby from the mother plant. (Do not forget that you need to separate it with a small section of the flower arrow.)
- Then take a small piece of polystyrene foam and make a small hole. Insert the separated process into the resulting circle and fix it in any way convenient for you.
- Prepare a small container of water and put the foam with the baby in the hole. But carefully make sure that the base of the process does not come into contact with water, but at the same time is no higher than two to three millimeters above the water level. Otherwise, you will not get the effect of such a structure.
- If the result is not noticeable for a long time, then try to place the baby so that its base only slightly touches the water. Perhaps this neighborhood will stimulate the growth of the root system.
In a home greenhouse
A process without a rhizome is in no case advised to be placed on a substrate, which is usually used to transplant an adult plant. For the "baby", it is still necessary to create conditions as close as possible to her natural, that is, tropical with high humidity.
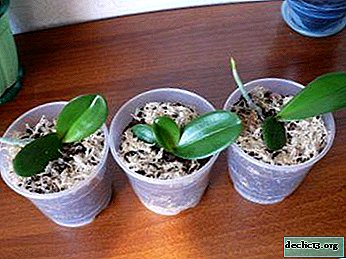 To ensure these conditions, you need to build a small greenhouse. For this you will need:
- plastic cup;
- a small amount of drainage;
- sphagnum moss;
- plastic bag;
- plastic bottle.
- After everything you need is in front of us, in a cup we punch several holes for air circulation and for excess water to flow through them.
- At the very bottom of the tank we put a drainage layer (it should not be too thick). Top with moss. In the upper part of the glass we make two side opposite holes. We will need them in order to stretch out the supports on which the child herself will hold. And she will be held at the expense of her leaves.
- After you make sure that the shoot is well fixed on the supports, you will need to cover it with a cropped plastic bottle. And put the greenhouse in a well-lit place to create a greenhouse effect. Do not forget to open the greenhouse every few minutes to ventilate the process.
- At the same time, once or twice every seven days you need to spray the shoot, but do it so that drops of water do not fall on the root outlet. Through time, experienced gardeners are advised to spray water with fertilizers.
 To ensure these conditions, you need to build a small greenhouse. For this you will need:
Naturally
This can be done even if the process is not separated from the mother plant. To do this, do the following manipulations:
- Get moss and soak it in water for about thirty minutes until it is completely swollen.
- Form from a moss a lump that is wrapped with thread so that it does not fall apart when attached to a baby.
- Attach a lump of moss to the base of the peduncle so that it does not fall off, but at the same time so that the thread does not damage the plant.
- The heavy young plant can be attached to the stick-stand with clamps, this will protect the plant from tipping over.
- If the apartment has very dry air, then the construction with moss can be wrapped with cling film to create a greenhouse effect. But then the baby orchids should be aired every day.
- Moss should be sprayed every day. You can add "Kornevin" to the water (use the stimulant once with regular water) to stimulate root formation.
- When young shoots roots appear, we plant a young orchid.
On average, in any of the extension methods, the process lasts about three months, but sometimes it can take up to six months. All these time frames are the norm, so all you can do at this time is just to observe and wait for the “miracle” to happen.
Care
 Particularly difficult to follow the rules during the development of the root system in the young shoot of the roots do not exist. But still you need to adhere to certain recommendations.
To get started, take care of enough light. This factor always stands in the first place for a tropical plant. If possible, nourish the baby not just with fertilizers, but with a growth stimulator.
Keep an eye on and react to the slightest changes in the state of the plant. If it starts to get worse, change the conditions of detention. Perhaps what is considered a common norm is not suitable for your orchid.
Do not forget that the water evaporates a little, so it must be periodically added. And also to change the liquid, since even it has the property of deteriorating, so you need to not only add, but also completely change.Possible problems
The difficulties that may arise during the process of growing roots in a child are not that many. The very first and perhaps the only thing can alert you - yellowing or drying of the appendix itself.
In this case, do not leave everything to chance and constantly monitor the condition of the baby. If it does not improve, change the conditions of detention. First of all, add light and top dressing, and also note that the appendix feels good when the room temperature is high. Therefore, the house should be constantly warm.
So, we told what a baby is with an orchid and why it is necessary for the plant itself, as well as a grower. We talked about how to help the shoot to grow the root system for normal functioning. We hope that the information specified in the article will be useful, both by an experienced gardener and a beginner.
Interesting video
Watch a video on how to grow roots in a baby orchid:
Watch the video: How I Make Orchid Roots Grow (January 2025).


-
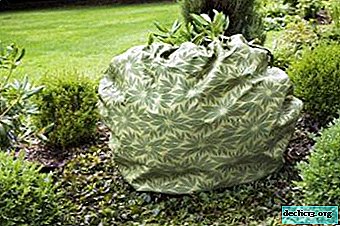
Warm clothing for the plant: is it necessary to cover the rhododendron for the winter in harsh Russian conditions?
Rhododendron is a plentifully flowering indoor or garden plant. It will decorate any interior and transform the garden with its luxurious, fragrant and bright colors. To enjoy its unprecedented beauty, gardeners spend a lot of effort on leaving. Is it necessary to shelter a flower for the winter, which is called old-fashioned azalea? ... -
-
-