How to step-by-step transplant Phalaenopsis orchids at home? We analyze the nuances
 Phalaenopsis is one of the most beloved species of orchids. Its flowers resemble butterfly wings. Both professional flower growers and amateurs are seriously passionate about his breeding.
But any houseplant must be properly looked after. Phalaenopsis has a unique root system, and it needs a timely transplant.
How to determine that it is time to transplant the plant and how to properly carry out this procedure, we will describe in detail in our article. Also watch a useful video on this topic.
What flower are you talking about?
ATTENTION: This is a species of orchid family plants whose homeland is tropical rainforest. The orchid got its name from the shape of a flower in the form of a butterfly.This delicate flower has about 70 species within the phalaenopsis genus.. Grows in Southeast Asia, Indonesia, the Philippines.
The importance of the procedure
Phalaenopsis can and should be transplanted. Every two or three years, he needs a change of substrate, and also grows his pot.
The main causes of transplantation at home:
 The pot became small. The main symptom is the filling of the interior of the pot with roots. That is, if the roots almost replaced the substrate in the pot, then it's time to transplant.
- Root disease. This is the reason for the emergency transplant. Otherwise, there is a risk of death of the flower. The cause of damage (decay) of the roots is most often the wrong care of the plant. The plant can either be flooded or the room temperature is too low.
 The pot became small. The main symptom is the filling of the interior of the pot with roots. That is, if the roots almost replaced the substrate in the pot, then it's time to transplant.
Do not focus on the fact that some of the roots that grow above the pot. This is a sign of a healthy orchid and you should not touch them.
When to spend?
The seasons and transplantation of phalaenopsis is a very important point in caring for the plant. As a rule, it is transplanted after a period of rest, before the start of active vegetation. This is the middle of spring. It is at this time that the rest period ends. The plant is entering the growth phase. It is very important to have time to transplant phalaenopsis before flowering!
About when to transplant the Phalaenopsis orchid, we wrote here.
Force Majeure
Reasons for an emergency transplant:
- Complete soil degradation. A characteristic feature is that the soil retains moisture for a long time (a week or longer). If this is observed, then the substrate should be urgently replaced.
- The defeat of the root system. Characteristic signs: blackening or drying of the roots, painful changes on the leaves or dropping them.
A few nuances
There are general rules for transplanting phalaenopsis. And this applies to both flowering and non-flowering plants. More details here should be focused on three points:
- A transplant of a blooming phalaenopsis will always be emergency. That is, if the flower is seriously ill or affected by pests. If such signs are not observed, then the transplant can be postponed.
- When transplanting a non-blooming orchid, damaged leaves and roots (if any) must follow. And also immerse the plant in a solution of potassium permanganate for 5 minutes. The solution should be slightly pink. Then the orchid should be washed under a stream of warm running water and treated with Fitoverim. The soil should also be shed with a weak solution of potassium permanganate.
- Transplanting a faded orchid is done in the same way, but the peduncle is removed. This is done to reduce the load on the plant.
What other methods are there besides the main one?
There can be many ways, or rather, the reasons for an orchid transplant. Here are the most basic ones:
 Baby department. This is one of the ways to propagate the Phalaenopsis orchid. At the same time, a matured baby (having its own roots and leaves) is separated from the mother plant and planted in the substrate.
- Cuttings. It is characterized by the fact that the stalk settles from the plant. As a rule, this is a faded flower stalk or side shoot. Each cuttings must have axillary kidneys (at least two). Such cuttings are grown in a mini-greenhouse on a wet substrate, and then planted in the ground.
- Emergency transplant. This is a transplant due to illness. Depending on the nature of the lesion, the plant is treated, pruned, disinfected, and then planted in the prepared soil.
- Transplantation after resuscitation. This method can be called emergency. It should be mentioned here that the effectiveness of this method is rather low, as well as the survival rate of orchids. It is a complete or partial loss of roots. If the roots of the orchid are gone (rotted), then they are removed without fail. After which the plant is reanimated, that is, it gives the opportunity to grow new roots, and therefore survive.IMPORTANT: Resuscitation is performed in several ways (in water, in air, in a greenhouse). After the young roots of phalaenopsis have grown, they are planted in the ground.
 Baby department. This is one of the ways to propagate the Phalaenopsis orchid. At the same time, a matured baby (having its own roots and leaves) is separated from the mother plant and planted in the substrate.
Step-by-step instruction
What you need for a transplant:
- Transparent pot. It should be 2-3 cm larger than the previous one. You need to select a pot so that the roots of the grown orchid fit freely into it. But at the same time, the pot should not be too big otherwise it will inhibit growth and flowering.
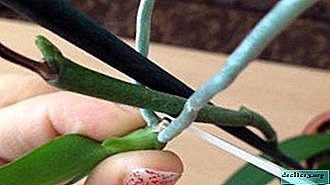
- Sharp scissors (pre-sanitized). They will need to prune diseased roots, if any are found.
- The substrate for orchids. It can be bought in a store or prepared independently. The substrate consists of pine bark and sphagnum moss.
- Bamboo stick for added stability.
- Disinfectants for tools.
- Activated charcoal or charcoal to cut.
Extracting Orchids from a Pot
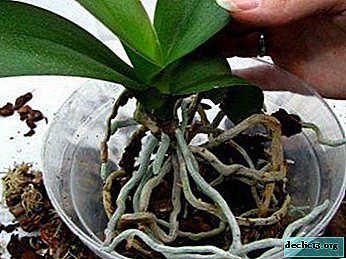
Those who have ever transplanted this flower know that removing an orchid from a pot is quite difficult. Especially if she is healthy. Of course, there are exceptions to any rule, and sometimes seizure is not difficult. But, nevertheless, you need to be prepared for this problem.
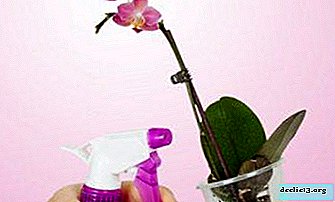
Healthy roots are usually very long and tangled. They are sometimes very tightly attached to the substrate, literally growing into it. In order to ease your task, you should place the pot with an orchid in warm water for 30 minutes. And then gently mash the pot with your hands. This should be done with extreme caution so as not to damage the roots.
TIP: If you are not sure that you will not damage the roots, it is best to cut the old pot with sharp scissors and carefully remove the orchid. Old and dry roots after extracting the flower must be trimmed.Watch the video on the correct extraction of orchids (phalaenopsis) from the pot:
Flushing and inspection of the plant
 Before transplanting your pet, it must be washed. This is best done by leaving the plant 15-20 in a bowl of warm water. Thus, the substrate will soak well and it will be easier to separate from the roots. If some parts of the substrate are firmly attached to the roots, then it is better to leave them.
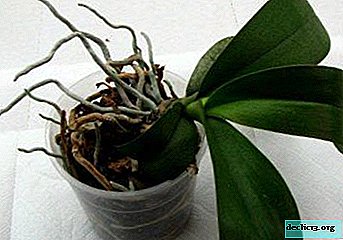
After the orchid is washed and dried, you should carefully examine it. This is necessary in order to make sure that the roots are healthy and there are no parasites on them, as well as on the leaves.
What to do if pests and problems have been detected?
If root problems are found, namely: dry, rotten, darkened or damaged roots, then they should be removed with scissors. Scissors must be sanitized.
Healthy phalaenopsis roots are firm, dense and resilient. If during inspection revealed roots that do not meet these requirements, then they must be considered sick and removed.
If pests are found, the orchid should be treated with a special composition according to the instructions. Before this, all defeated parts are removed. The substrate should also be treated before transplantation. After transplanting, such an orchid will need additional attention and processing. Such a plant should be isolated from others.
Landing
Soil can be purchased at the store, or can be prepared independently. Landing is performed as follows:
- Drain is placed at the bottom of the pot.
- A little substrate is placed on top.
- Then the plant is carefully placed in a pot and held by hand on weight.
- Holding the plant, you need to fill the free space of the pot with a substrate.
- If the upper roots do not fit no problem, you can leave them on the surface. For an orchid, this is even better.
Watch the video about planting orchids in the ground:
Further care
What is an orchid after a transplant:
 The first watering should be carried out no earlier than in 2-3 days. This time is necessary for the orchid
could adapt and survive stress. Any transplant is stressful for the plant. Also, time must pass so that the places of cuts can be tightened if untouched roots have been removed. Since infection can get into open wounds with water.- Fertilizers can be applied no earlier than a month after transplanting.
- Be sure to create a support for the peduncle, and if necessary, not one. A bamboo stick with a clip can serve as a support.
- The plant should be placed in a place inaccessible to direct sunlight, as well as drafts. The place where the orchid is located is best obscured.
- It is very important to monitor the sinuses of the leaves, there should not accumulate water. Otherwise, the decay process may begin.
- After transplanting, it is better to water the orchid with moderately warm water. In this case, water should not be allowed to enter the sinuses of the leaves. After 2-3 weeks, it is already possible to water by soaking in containers.
 The first watering should be carried out no earlier than in 2-3 days. This time is necessary for the orchid
Watch the video about caring for phalaenopsis (orchid) after transplantation:
If you spend at the wrong time?
If phalaenopsis is transplanted during flowering, expect a drop in flowers. In addition, the orchid can weaken, as the load on it increases significantly. This can manifest itself in the cessation of flowering and growth retardation. And also your pet may become less resistant to disease.
The conclusion is simple - an orchid requires maximum attention. To successfully grow it, you should look for information, replenish the store of knowledge and be sure to put them into practice. Something to turn out, something not. But your work will not be without result. So, beautiful and gentle phalaenopsis will constantly delight you with its beauty!
Watch the video: Orchid Care for beginners - How to repot Phalaenopsis Orchids (April 2024).


-
What you can eat and what you can not eat in the Post
The Orthodox Church connects the tradition of fasting with the Great Holidays, Sacred historical events and the Sacrament of Communion. Fasting is an ascetic practice, which implies a person’s abstinence from eating animal food, moderation in fasting, and the rejection of other carnal pleasures. ... -
-
-